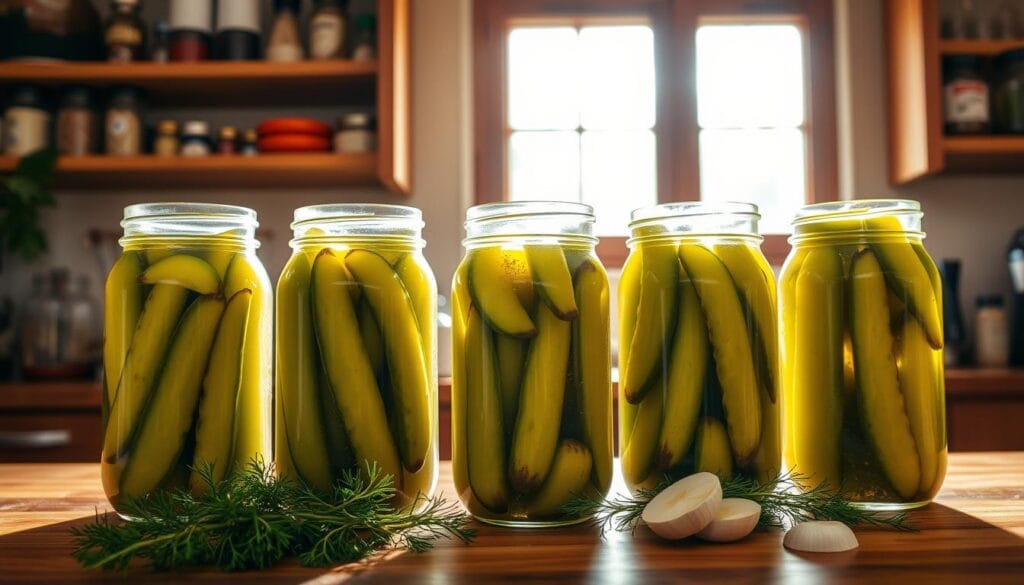
Imagine biting into a crunchy, tangy snack that’s bursting with flavor. You can make this with a simple kosher dill pickle recipe. Making homemade dill pickles is easier than you think. With an average rating of 4.92 from 125 votes, you can trust this recipe will give you delicious results.
In just 1 hour and 25 minutes, you can make 7 quarts of pickles. This is enough for 70 servings, perfect for snacking or sharing with friends and family.
With a kosher dill pickle recipe, you get the perfect mix of crunch and flavor. The secret to great pickles is using the right ingredients. You’ll need pickling cucumbers, dill, and pickling salt.
You’ll need about 5 cucumbers per quart jar, 1 tablespoon of pickling salt, and 1 tablespoon of dill seed or 3 heads of fresh dill. By following a simple recipe, you can make delicious homemade dill pickles. They’re perfect for any occasion.
Key Takeaways
- You can make 7 quarts of pickles with a simple kosher dill pickle recipe
- Homemade dill pickles are easy to make and require minimal ingredients
- The right cucumbers, dill, and pickling salt are essential for great pickles
- You can store pickled produce for up to 1 year in sealed jars
- A kosher dill pickle recipe yields crisp and tangy snacks perfect for any occasion
- Using an easy dill pickle recipe, you can create delicious pickles in just 1 hour and 25 minutes
- Pickles made with a kosher dill pickle recipe are shelf-stable for up to 1 year when properly sealed and stored
The History of Kosher Dill Pickles
Kosher dill pickles have a long history. They started in Eastern European Jewish cuisine and grew in American delis. Pickling cucumbers began over 4,000 years ago in ancient Mesopotamia and India.
As people moved and traded, they shared pickling spices and techniques. This influenced the making of traditional kosher dill pickles.
In the United States, pickles were first introduced by Christopher Columbus. Later, Eastern European immigrants brought their pickling traditions to New York. New York became the pickle industry’s center by the late 19th and early 20th centuries.
To make traditional kosher dill pickles, you need the right pickling spices for dill pickles. These include dill, garlic, and sometimes mustard seeds.
For more on Jewish pickles, including traditional kosher dill pickles, visit this guide. It explores the cultural and historical importance of pickling in Jewish cuisine.
Making traditional kosher dill pickles involves soaking cucumbers in a brine solution. The brine has 20-40 grams of salt per liter. Fermentation time can be a few days to several weeks, making half-sour or full-sour pickles.
Origins in Eastern European Jewish Cuisine
In Eastern Europe, pickling preserved vegetables during winter. Families passed down their secret recipes for traditional kosher dill pickles through generations.
Evolution in American Delis
In American delis, traditional kosher dill pickles became a staple. They were served as a side dish or used in sandwiches. Delis introduced new pickling spices for dill pickles and techniques, changing the pickles’ flavor and texture.
Traditional vs Modern Methods
Traditional methods are used to make traditional kosher dill pickles. But, modern techniques and ingredients have been added. These changes improve the pickling process and the pickles’ flavor and shelf life.
Essential Ingredients for Perfect Pickles
To make delicious homemade dill pickles, you need the right ingredients. You’ll need pickling cucumbers, fresh dill, garlic, and pickling salt. For a batch, use about 4-5 pounds of cucumbers.
The brine needs 8 cups of liquid. This is made of 4 cups of water and 4 cups of vinegar with 5% acidity.
For crunchy dill pickles, balancing flavors is key. Use 1/2 cup of pickling and canning salt for the brine. Add 1 teaspoon of each spice, like mustard seeds and dill seeds, for each pint jar.
For extra crunch, add pickle crisp. Use 1/8 teaspoon per pint or 1/4 teaspoon per quart.
- 4-5 pounds of cucumbers
- 8 cups of liquid (4 cups of water and 4 cups of vinegar)
- 1/2 cup of pickling and canning salt
- 1 teaspoon of each spice (mustard seeds, dill seeds, coriander seeds, black peppercorns) per pint jar
- 1/8 teaspoon of pickle crisp per pint or 1/4 teaspoon per quart (optional)
With these ingredients and the right process, you can make tasty homemade dill pickles. They’ll be crunchy and full of flavor. Always choose fresh, high-quality ingredients for the best results.
| Ingredient | Quantity |
|---|---|
| Cucumbers | 4-5 pounds |
| Water | 4 cups |
| Vinegar | 4 cups |
| Pickling and canning salt | 1/2 cup |
Choosing the Right Cucumbers
Choosing the right cucumbers is key to a great easy dill pickle recipe. Look for cucumbers that are firm, fresh, and the right variety. Persian and Kirby’s cucumbers are best because they stay crisp.
Before pickling, chill cucumbers in an ice bath for 4 to 5 hours. This keeps them firm and crunchy. For 6 quarts of pickles, you’ll need about 6 lbs. of cucumbers.
Here are some guidelines for choosing the right cucumbers:
- Persian and Kirby’s cucumbers are the best varieties for pickling
- Cucumbers should be firm and fresh
- Chill cucumbers in an ice bath for 4 to 5 hours before pickling
- 6 lbs. of cucumbers are recommended for making approximately 6 quarts of dill pickles
By following these tips, you can make delicious homemade pickles. They’re perfect for snacking or adding to your favorite dishes. Enjoy the crunch and flavor of homemade pickles all year.
| Cucumber Variety | Texture | Flavor |
|---|---|---|
| Persian | Firm and crisp | Mild and refreshing |
| Kirby’s | Firm and crunchy | Slightly sweet and tangy |
| English | Softer and more delicate | Milder and less crunchy |
Required Equipment and Tools
To make and can kosher dill pickles, you need the right tools. The right equipment ensures your pickles are crunchy and flavorful.
You’ll need jars, lids, rings, and a canner. Sterilizing these items is key to avoid contamination. Wash them in hot soapy water and then heat them in a 250°F oven for 10 minutes.
Here are some more tools you might need:
- A large pot for boiling the pickles
- A colander or strainer for draining the pickles
- A utensil for packing the pickles into the jars
- A canner for processing the jars
For the perfect flavor, you need the right pickling spices. Common spices include dill seeds, garlic, and mustard seeds. Adjust the spices to your liking, but use the right mix for the best taste.

With the right tools, your dill pickle recipe will be a success. Always follow safe canning practices to avoid spoilage and illness.
| Equipment | Description |
|---|---|
| Jars | For storing the pickles |
| Lids | For sealing the jars |
| Rings | For tightening the lids |
| Canner | For processing the jars |
The Classic Kosher Dill Pickle Recipe
To make traditional kosher dill pickles, start by making a brine. You’ll need vinegar, water, and spices. Then, pack cucumbers into jars and process them in a canner. This recipe is simple and classic.
First, mix 4 cups of white vinegar, 4 cups of water, ½ cup granulated sugar, and ⅓ cup pickling salt. This is your brine.
Next, add 6 tablespoons of dill seed to the brine. This gives the pickles their unique flavor.
Then, pack 3 to 3 ¼ lbs. of small pickling cucumbers into jars. Leave some space at the top.
Lastly, process the jars in a boiling-water canner for 10 minutes. This seals the pickles and makes them shelf-stable.
This recipe makes 6 pints of pickles. Each serving has about 25 calories, 859mg of sodium, and 4g of sugar.
The pickles take 1 to 2 weeks to ferment. The best temperature is between 65°F and 75°F.
By following this recipe, you can enjoy delicious, crunchy kosher dill pickles all year.
Understanding the Fermentation Process
Fermentation is key when making homemade dill pickles. It lets natural bacteria on cucumbers make lactic acid. This preserves the pickles and gives them a sour taste. To ferment well, you need the right temperature, salt, and water.
The fermentation process takes about 8 days. The best temperature is between 65 to 75 degrees Fahrenheit. It’s important to check the pickles every day to make sure they’re fermenting right.
After 8 days, you’ll see foam on the surface. Skim it off then.
Here are some key factors to consider when fermenting your homemade dill pickles:
- Temperature: 65 to 75 degrees Fahrenheit (18 to 24 degrees Celsius)
- Duration: 8 days
- Water: 8 cups
- Salt: 8 tablespoons (80 grams)
- Garlic: 4 cloves
- Dill: 1 bunch of fresh dill weed
By following these guidelines and using an easy dill pickle recipe, you’ll make delicious homemade dill pickles. They’re great for snacking or adding to your favorite dishes.

To get the best results, consider the nutritional information per serving:
| Nutrient | Amount | Daily Value |
|---|---|---|
| Sodium | 2887 mg | 126% |
| Total Carbohydrate | 3 g | 1% |
| Dietary Fiber | 1 g | 2% |
| Protein | 1 g | 1% |
With the right conditions and a little patience, you’ll enjoy your homemade dill pickles soon. They’re made with an easy dill pickle recipe that’s sure to please.
Quick vs Traditional Pickling Methods
There are two ways to make crunchy dill pickles: quick pickling and traditional pickling. Quick pickling is perfect for those who want pickles fast, ready in just 24 hours. Traditional pickling takes longer but offers a richer taste.
Choosing the right method depends on your preferences. Here are some things to think about:
- Time: Quick pickling is quicker, but traditional pickling has a deeper flavor.
- Equipment: Traditional pickling needs a big container, like a 10-gallon crock. Quick pickling works with smaller jars.
- Flavor: Traditional pickling is tangier and sourer. Quick pickling is milder.
Great pickles come from fresh ingredients and a good recipe. With patience and practice, you can make tasty crunchy dill pickles at home.
| Pickling Method | Time | Equipment | Flavor |
|---|---|---|---|
| Quick Pickling | 24 hours | Small jars | Mild |
| Traditional Pickling | Several days | Large crock | Tangy |
Safety and Sterilization Guidelines
When canning and pickling, safety and sterilization are key. They prevent spoilage and foodborne illness. To make your dill pickle recipe perfect, follow guidelines for jars, lids, and utensils. Sterilize all equipment in boiling water for at least 10 minutes. This kills bacteria and other microorganisms.
For a great dill pickle recipe, the right pickling spices are essential. The type and amount of spices depend on your taste. A mix of dill seed, garlic, and pickling spice works well. The goal is to enhance the natural cucumber taste.
| Processing Method | Elevation | Processing Time |
|---|---|---|
| Hot Pack | 0 – 1,000 ft | 5 min |
| Hot Pack | 1,001 – 6,000 ft | 10 min |
| Hot Pack | Above 6,000 ft | 15 min |
| Raw Pack | 0 – 1,000 ft | 10 min (pints), 15 min (quarts) |
| Raw Pack | 1,001 – 6,000 ft | 15 min (pints), 20 min (quarts) |
| Raw Pack | Above 6,000 ft | 20 min (pints), 25 min (quarts) |
By following these guidelines and using the right pickling spices, you can make delicious and safe dill pickles. Enjoy them for months to come.

Troubleshooting Common Issues
When making homemade dill pickles, you might run into some common problems. These can affect how your pickles taste and look. Issues like soft or mushy pickles, mold, and off-flavors are common.
Soft or mushy pickles often come from the blossom end of the cucumber. This part has enzymes that can make the pickles soft. To fix this, cut off the blossom end before pickling. Also, using more vinegar in the brine helps keep your pickles crunchy. Aim for a vinegar ratio that’s at least 5% acidity for crisp pickles.
Here are some other common problems and how to solve them:
- Mold: Regularly check your pickles for mold. Make sure they’re fully covered in brine and the brine is acidic enough.
- Off-flavors: If your pickles smell bad, they might be spoiled. Remove any bad pickles. Also, adjust the vinegar type and amount to get the right flavor.
- Discoloration: Use non-reactive tools like food-grade unchipped enamelware, glass, stainless steel, or stoneware. Hard water can also cause color changes, so use distilled water for the brine.
By following these tips, you can fix common problems and make great homemade dill pickles.
| Issue | Cause | Solution |
|---|---|---|
| Soft or mushy pickles | Enzymes in the blossom end of the cucumber | Trim the blossom end before pickling |
| Mold | Insufficient acidity in the brine | Check the pickles regularly and remove any visible mold |
| Off-flavors | Imbalanced vinegar type and ratio | Adjust the vinegar type and ratio to balance the flavors |
Achieving Maximum Crunchiness
To get the perfect crunch in your crunchy dill pickles, you need to focus on a few key things. These include the freshness of the cucumbers, the brine’s saltiness, and how you store them. Using the best dill pickle recipe and following some simple tips can help you get the texture just right.
For maximum crunch, pick the right cucumber types like Kirby and Lebanese. Soaking them in ice water can also help. It’s best to jar them within 2 to 3 days of picking to keep them crisp.
Here are some more tips for the perfect crunch:
- Use the right amount of calcium chloride: ¼ to ¾ tsp. per 1L jar
- Use the right amount of salt: 1.5 to 2 tbsp. (2.5% to 3.5% salt concentration) per 1L jar
- Ferment at the optimal temperature: around 17°C
- Ferment for the right amount of time: 5 to 8 days

By following these tips and using the best dill pickle recipe, you can make your crunchy dill pickles perfect. Enjoy them for a long time.
| Factor | Recommendation |
|---|---|
| Cucumber variety | Kirby and Lebanese |
| Calcium chloride | ¼ to ¾ tsp. per 1L jar |
| Salt | 1.5 to 2 tbsp. (2.5% to 3.5% salt concentration) per 1L jar |
| Fermentation temperature | Around 17°C |
| Fermentation time | 5 to 8 days |
Storage and Shelf Life
Keeping pickles fresh and safe is key. This is true whether they’re in the fridge or a cool, dark spot. For a dill pickle canning recipe, it’s vital to store them right. This keeps the pickles tasty and fresh. The spices used, like dill weed and garlic, also play a role in how long they last.
Use airtight containers or jars with tight lids to store pickles. Keep them away from sunlight and heat. For longer storage, a cool, dark place like a pantry or basement works best. Canned pickles can last up to a year.
Refrigeration Guidelines
Refrigeration is great for pickles you plan to eat in a few weeks. Homemade dill pickles can stay fresh for 3-4 weeks in the fridge. Store them in airtight containers or jars, away from strong-smelling foods.
Long-Term Storage Solutions
For longer storage, use a water bath canner. This method seals the jars in boiling water, preventing spoilage. Canning takes about 10 minutes to seal properly. Wait at least 3 weeks after canning to enjoy the best flavor.
| Storage Method | Storage Life |
|---|---|
| Refrigeration | 3-4 weeks |
| Canning | Up to 1 year |
| Fermentation | Several months to 1 year |
By following these storage tips and using the right spices, you can enjoy your homemade pickles for longer.
Serving Suggestions and Pairings
Kosher dill pickles are great for many dishes, from sandwiches to salads. They add flavor and texture to any meal. With a simple recipe, you can make tasty pairings like pickle and cheese sandwiches.
Here are some ideas for using homemade dill pickles:
- Try Alpine cheeses like gruyere or raclette with pickles for a classic taste.
- Pair Point Reyes Blue Cheese with hot sour pickles for a sweet and tangy mix.
- Match Manchego cheese with Kosher Dill Pickles for a unique flavor in tapas or charcuterie.

There are many ways to serve homemade dill pickles. They’re perfect for adding a tangy twist to salads, sandwiches, and sides. With a simple recipe, you can make everything from classic sandwiches to new cheese pairings.
| Pickle Type | Cheese Pairing | Flavor Profile |
|---|---|---|
| Kosher Dill Pickles | Manchego Cheese | Tangy, savory |
| Hot Sour Pickles | Point Reyes Blue Cheese | Sweet, acidic |
| Sweet Bread & Butter Pickles | Sharp Cheddar Cheese | Balance of boldness and sweetness |
Health Benefits of Fermented Pickles
Fermented pickles, like traditional kosher dill pickles, are good for you. They have probiotics and are full of nutrients. You can learn more about their benefits on websites like naturally fermented kosher dills. One cup of pickles gives you almost half of the vitamin K you need each day.
It’s important to know what spices are used to make traditional kosher dill pickles. These spices can make the pickles taste better and be more nutritious. Fermented pickles usually have less sodium than regular pickles, but the amount can vary.
Probiotic Properties
Fermented pickles have probiotics that help your gut. They support good bacteria in your gut, which can improve digestion and boost your immune system.
Nutritional Value
Pickle juice is packed with vitamin C, giving you 30% of what you need daily. It’s also great for athletes because it can help relieve muscle cramps faster than water.
Creative Variations and Flavoring Options
When making the best dill pickle recipe, try different spice mixes and flavorings. You can add garlic, herbs, or spices to your dill pickle canning recipe. This makes it uniquely yours.
Understanding how ingredients work together in pickling is key. Adjusting garlic, dill, or spices can change the flavor to match your taste.
Here are some ideas for creative variations:
- Adding a pinch of red pepper flakes for a spicy kick
- Using fresh herbs like parsley or basil for a fresh taste
- Trying different vinegars, like apple cider or white wine, for a unique flavor
Exploring these options can elevate your dill pickle canning recipe. You’ll enjoy a homemade snack that’s just right for you. Whether you prefer a classic dill pickle or something new, the possibilities are endless.
| Ingredient | Quantity | Notes |
|---|---|---|
| Dill | 1/4 cup | Fresh or dried, depending on preference |
| Garlic | 3-4 cloves | Minced or crushed for added flavor |
| Red pepper flakes | 1/4 teaspoon | Optional, for some heat |
Conclusion
With the right ingredients, equipment, and techniques, you can easily make delicious homemade kosher dill pickles. Whether you love the classic tangy and crunchy flavor or want to try new variations, this guide has you covered. It gives you all the essential knowledge to start.
From picking the perfect cucumber varieties to understanding fermentation, you’re ready to make your own kosher dill pickles. You’ll impress family and friends with your homemade batch. DIY pickling is a rewarding experience that opens up a world of flavors.
So, what are you waiting for? Get your supplies ready, follow the steps, and start pickling. Your taste buds will thank you as you enjoy the homemade goodness of crisp, tangy kosher dill pickles.
FAQ
What are the origins of kosher dill pickles?
What are the essential ingredients for making the perfect kosher dill pickles?
How do I choose the best cucumbers for pickling?
What equipment is needed to make and can kosher dill pickles?
How do I make the classic kosher dill pickle recipe?
What is the role of fermentation in making kosher dill pickles?
What are the differences between quick and traditional pickling methods?
How can I ensure my kosher dill pickles are safe and properly canned?
What can I do to achieve maximum crunchiness in my kosher dill pickles?
How should I store my homemade kosher dill pickles?
Source Links
- Favorite Kosher Dill Pickles – https://www.lanascooking.com/favorite-kosher-dills/
- Quick and Easy Refrigerator Pickles – Once Upon a Chef – https://www.onceuponachef.com/recipes/quick-and-easy-dill-pickles.html
- Homemade Dill Pickles Recipe – https://iwashyoudry.com/homemade-canned-dill-pickles/
- Kind of a Big Dill – http://thehouseandhomemagazine.com/food-and-drink/kind-of-a-big-dill/
- Pickled cucumber – https://en.wikipedia.org/wiki/Pickled_cucumber
- The 96-Year History of Mt. Olive Pickle Company | Mt. Olive Pickles – https://www.mtolivepickles.com/history/
- Dill Pickle Recipe for Canning – https://practicalselfreliance.com/dill-pickle-recipe-home-canning/
- The Best Ever Deli-Style Sour Pickles Recipe. Ever. Seriously. – Garden Therapy – https://gardentherapy.ca/sour-pickles/
- The Secret Trick for Delicious and Crispy Dill Pickles – https://104homestead.com/crispy-dill-pickle-recipe/
- 23 Different Types Of Pickles And What Makes Them Unique – Tasting Table – https://www.tastingtable.com/831648/different-types-of-pickles-and-what-makes-them-unique/
- Best Homemade Garlic Dill Pickles Recipe + Canning Instructions – https://melissaknorris.com/best-homemade-pickles-recipe/
- Refrigerator Dill Pickles – https://dishnthekitchen.com/refrigerator-dill-pickles/
- How to Make the Best Ever Dill Pickles – https://www.bhg.com/recipe/pickles/best-ever-dill-pickles/
- How to Make Kosher Dill Pickles – https://thecookful.com/how-to-make-kosher-dill-pickles/
- Homemade Dill Pickles – https://www.allrecipes.com/recipe/244811/homemade-dill-pickles/
- National Center for Home Food Preservation – National Center for Home Food Preservation – https://nchfp.uga.edu/how/ferment/recipes/dill-pickles/
- The Best Classic Kosher Dill Pickle Recipe — Tiaras & Tantrums – https://www.tiarastantrums.com/blog/the-ultimate-classic-kosher-dill-pickle-recipe.html
- Quick Pickling 101 — Kendall Andronico – https://www.kendallandronico.com/all-recipes/pickling-101
- National Center for Home Food Preservation – National Center for Home Food Preservation – https://nchfp.uga.edu/how/pickle/cucumber-pickles/quick-sweet-pickles/
- Refrigerator Garlic Dill Pickles – https://thecreeksidecook.com/refrigerator-garlic-dill-pickles/
- National Center for Home Food Preservation – National Center for Home Food Preservation – https://nchfp.uga.edu/how/pickle/general-information-pickling/causes-and-possible-solutions-for-problems-with-pickled-foods/
- Troubleshooting Common Pickling Problems: Tips to Get Your Batch Back on Track – https://justpickling.com/troubleshooting-common-pickling-problems-tips-to-get-your-batch-back-on-track
- 10 Tips for Making Crunchy Pickles (With Recipe) – https://revolutionfermentation.com/en/blogs/fermented-vegetables/how-to-make-crunchy-pickles/
- Creamy, Crunchy Dill Pickle Dip Recipe | Style and Grace – https://styleandgrace.ca/2024/10/07/creamy-crunchy-dill-pickle-dip/
- Homemade Pickled Cucumbers: The Ultimate Guide – mytastycurry.com – https://mytastycurry.com/homemade-cucumber-pickle-recipe/
- Dill Pickles Canning Tutorial + Grandma’s Secret Recipe | Simplify Live Love – https://simplifylivelove.com/dill-pickle-recipe-for-canning/
- Fermented Pickles – Quick & Easy Old-Fashioned Recipe – https://melissaknorris.com/podcast/old-fashioned-salt-and-water-fermented-pickles/
- Easy Refrigerator Dill Pickles (Paleo, Whole30, Vegan) – https://www.onelovelylife.com/refrigerator-dill-pickles/
- I’m Obsessed with Pickles—Here’s 35 Recipes I’m Adding to My Recipe Roster – https://theeverymom.com/pickle-recipes/
- In A Pickle: Cheese and Pickle Pairings | The Cheese Professor – https://www.cheeseprofessor.com/blog/cheese-pickle-pairings
- Are Pickles a Gut-Healthy Snack? An RD Explains the Health Benefits and Drawbacks – https://www.realsimple.com/are-pickles-healthy-7093373
- I Drank Pickle Juice Every Day for a Week—Here’s What Happened – https://www.thehealthy.com/food/pickle-juice-every-day/
- 19 Pickling Recipes That Go Way Beyond Cucumbers – https://www.bhg.com/recipes/how-to/preserving-canning/pickled-recipes/
- Homemade Fermented Pickle Recipe | The Prairie Homestead – https://www.theprairiehomestead.com/2015/08/fermented-pickle-recipe.html
- What Makes Pickles Kosher? Unraveling the Mystery Behind Kosher Pickle – https://chappyspickles.com/blogs/picklelicious-chronicles-dill-ightful-tales-from-the-brine-side/what-makes-pickles-kosher-unraveling-the-mystery-behind-kosher-pickles
- Grandma’s Fermented Dill Pickles (Easiest Recipe!) – https://www.fermentingforfoodies.com/grandmas-fermented-pickles/